ListViews are a great way to present collections of information in an app. Flutter is an app development framework which is very easy to get started with. It provides ready to use components to get you going, including those that we’ll use in this tutorial to create a horizontal ListView.
In this post, we’ll go through the steps of putting together a simple horizontal ListView. It’ll take you less than 20 minutes to complete and doesn’t require any special tools. You can use DartPad, which is a free web based editor that lets you try out Flutter code without the need to install anything on your computer. To follow along with this tutorial, head over to https://dartpad.dev/

What Is a ListView?
A ListView is a container for collections of objects for users to scroll through when there are too many objects to fit on the screen at one time. The objects are usually all of the same type. In some cases it is a finite list of items, such as a list of sections in a news publication like sports, entertainment, finance, lifestyle, and so on. In other cases, it could be an infinite list of items, such as posts on a social media application.
ListViews can be vertical, where the user scrolls up and down, or horizontal, where the user scrolls left and right.
Why Would You Need a Horizontal ListView?
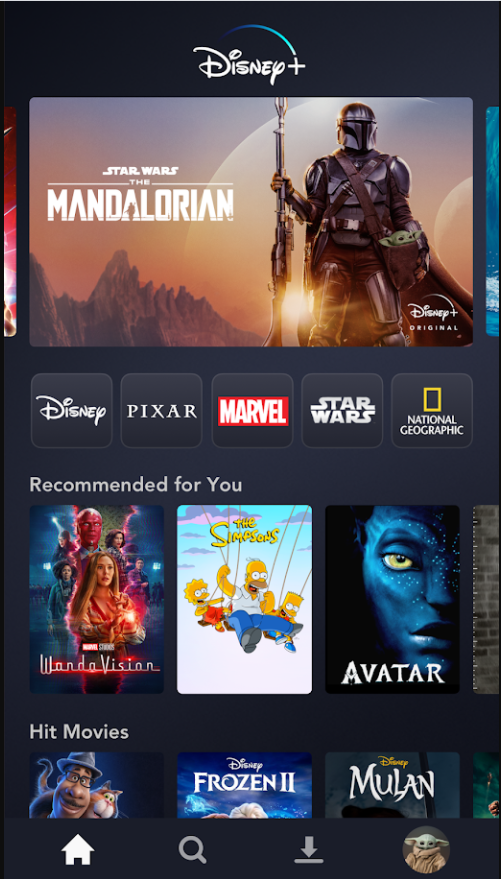
Horizontal ListViews are very useful when you need to scroll through categories of information, but you do not want the categories to take up the full vertical space of your screen. Many popular apps use horizontal ListViews. For example, see below how Disney+ uses them for scrolling through shows, and how DoorDash uses them to let users scroll through restaurants they’ve recently ordered from.

What We’ll Build
We’ll build a simple app that lets users scroll horizontally through a list of their favorite ice cream flavors. We’ll represent each flavor of ice cream as an individual card. This simple app will teach you how to create horizontal ListViews. At the end, you’ll have a useful reference that you can further extend and customize to your needs. See below for what the final product will look like.

Step 1 : Setting up the Basic App Container
First, we set up the basic app shell. Go ahead and paste the code below into your DartPad. The code creates a basic Flutter app, which can be used as a starter template for any app. When you run the code in DartPad, you’ll see a home screen with a title bar at the top and a text widget in the center. In the next step, we’ll replace the text widget in the main body of our app and build out our ice cream horizontal ListView.
Step 2: Adding the Variables That Define the Ice Cream Card
Second, we’ll define an ice cream card by specifying a flavor name and a flavor color. For now, let’s add these two variables to the MyHomePage widget; we’ll make use of these variables in Step 3.
Step 3: Insert the Widgets Needed for a Horizontal ListView
Now, we replace our scaffold body with the widgets for our horizontal ListView. There is more than one way to create a horizontal ListView in Flutter. Here, we create it in a straightforward way using a fixed number of child elements. This method uses a SingleChildScrollView widget with a Row child element. A SingleChildScrollView is a Flutter widget that scrolls its child element when it’s too big to fit on the screen. In our case, the child element is a Row widget that will hold our list items. By setting the ScrollDirection property to Axis.horizontal, we get the effect that we need.
We shall start off by inserting a single container widget in the row. You’ll see a single box in the middle of the screen. It won’t scroll yet because there’s only one card. In the next step we add more container widgets to the row so that it overflows and becomes scrollable.
Step 4: Seeing it Scroll
Go ahead and copy and paste multiple containers as child elements to the row. The list will now scroll when you drag any container from left to right because there are more containers than can fit on the screen.
Step 5: Improving Our Cards
Congratulations! You now have a scrolling horizontal ListView. Next, we’ll improve our code and make the ice cream cards look a lot nicer. First, create a new widget class, named IceCreamCard, that defines the user interface for a single ice cream card. This new widget class improves the visual appearance. Instead of a basic container, we now have one that’s decorated and includes an ice cream icon. See below for the full code listing. Notice that we define IceCreamCard outside of the MyHomePage widget. This improves modularity and code clarity. In the next step, we’ll reference IceCreamCard back in our MyHomePage widget.
Step 6: Adding Ice Cream Cards to the Horizontal ListView
In this step, we replace our plain containers in the horizontal ListView with our new and improved ice cream cards. Copy the code below into the MyHomePage widget. Notice that by defining the IceCreamCard widget separately and referencing it here, the code in MyHomePage is much more concise and easier to follow. Furthermore, by modularizing the code in this way, it allows us to reuse IceCreamCard in other places if we choose to. Finally, remove the two variables for flavorColor and flavor that we added in Step 2, since we don’t need these anymore.
Step 7: Test the App
Congratulations! You’ve made it to the end of this tutorial. Now go ahead and test the app in different scenarios. For example, change the number of ice cream flavors and verify that the user interface behaves as expected. If you get stuck at any point, you can visit DartPad to see the end product.

Conclusion
We have gone through the steps for creating a horizontal ListView in a simple Flutter app. You saw that using Flutter, this is so easy that your learned it in less than 20 minutes. We began by creating a simple app skeleton with a placeholder text widget in the center. Then, we replaced the placeholder text widget with the widget tree needed to generate a horizontal ListView, and we used plain container widgets to confirm that we had a working horizontal ListView. Finally, we refactored our code and beautified our horizontal list items with colored icons. The final code was modular, concise, and easy to modify.
Now that you’ve learned how to create a horizontal ListView, why not have some fun and modify it? Feel free to customize it and add your own flavors! You can even create a whole new list with different list items — perhaps your favorite movies or sports teams!
If you want to learn more, a lot of useful content can be found on Waldo. There, you’ll find content on mobile design, mobile engineering, QA & testing, and more.
This post was written by Daliso Zuze. Daliso is an expert in agile software delivery using Scrum. Besides that, he’s an experienced digital transformation consultant and entrepreneur. His technical skills center around mobile app development and machine learning.
Automated E2E tests for your mobile app
Get true E2E testing in minutes, not months.