In Android development, UI design happens in an XML layout file. Then, the business logic code is written in a Kotlin or Java file. As a result, a basic activity (a single screen) is made up of two files. First is the activity layout XML file, and then there’s a Kotlin file that contains the business logic code.
To further explain the last statement, let’s take a look at an example. When you start the process for creating a new empty activity in Android Studio, you’ll get the following dialog:

Now, let’s walk through the above screenshot. The first field is where the name for the Kotlin file that’ll be associated with the new activity is specified. The second field specifies the name of the layout XML file. Once you click the Finish button, Android Studio will generate both files in their respective folders.
With all that said, what is findViewById()? And how’s it related to the XML and Kotlin files of an activity?
Well, the simple answer to both questions is that the findViewById() method provides a way for you to make reference to a View from within your Kotlin code. In other words, it binds Views to the Kotlin code. For example, you can use the method to get a reference to a TextView and then use that reference to change the text content of the View from your Kotlin code.
The Kotlin findViewById() method has been an important feature for working with Android activities for many years. And in this post, we’ll look at a comprehensive guide on how to debug Kotlin findViewById().
We’ll start by taking a look at an example of the findViewById() method in action.

Code Example of findViewById()
To demonstrate the findViewById() method in action, let’s walk through some code snippets for a layout XML and the associated Kotlin code.
First, we’ll start with the XML code.
The above code adds two Views to an activity. The first View is a TextView that displays the text “Hello World!” while the second is a button. Note down the IDs for both Views, as they’ll be used in the associated Kotlin code.
Next, we’ll look at some Kotlin code that interacts with the XML Views.
Here, there’s a reference to the two Views present in the XML layout. This was done using the findViewById() method and the correct ID for each View. For example, findViewById(R.id.button1) has the ID for the button as a parameter in findViewById. We also set the text value for the TextView to “Hi there!” using the reference. This was made possible thanks to the findViewById method.
Now that you’ve seen how Kotlin findViewById works, let’s dive into debugging the method.
Debugging Kotlin findViewById
In this section, we’ll look at common issues with the Kotlin findViewById method and how to debug them.
1. Invalid ID
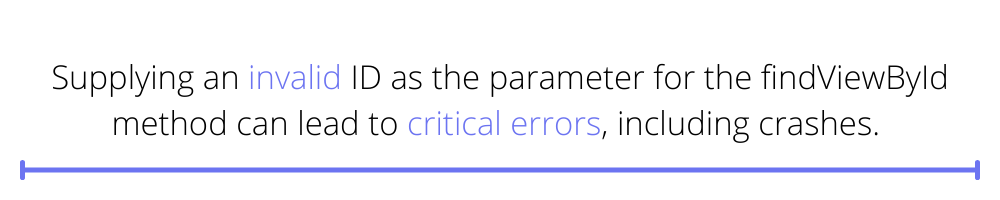
Supplying an invalid ID as the parameter for the findViewById method can lead to critical errors, including crashes. Or in some cases, it can cause your app to behave in an unexpected way.
Android Studio will usually catch this type of error while compiling your code. The Android Studio IDE will also show an unresolved reference error message in the Kotlin file.

You can debug this error by cross-checking the layout file and verifying that the value of ID for the affected View is the same as what you entered in findViewById. If you notice any difference, you have two options for resolving the issue.
- The first option is to update the value for ID in your XML to the value in your Kotlin code.
- The second option is to change the reference for ID in findViewById to whatever value you have in the XML layout. In the case where there’s no ID specified for the View, the fix will be to set an ID property to it.
2. Referencing ID From Wrong XML File
The next error is referencing the wrong ID. This is different from the previous case in two ways:
- In this case, the ID actually exists in your project.
- Therefore, Android Studio won’t display any error message in the Kotlin file.
A wrong ID here means referencing an ID for Views from different layout XML files. For example, if activity_main.xml is the content View for MainActivity.kt, referencing a View from another XML file by default will cause this type of error. To reduce the chances of this error occurring, you should ensure that you’re referencing the correct View in the findViewById() method.
This type of error usually passes the compilation stage. As a result, you’re going to detect it while debugging your app on a device or emulator.
While running the app on a device or emulator, you’ll want to switch to the Logcat tab of Android Studio. Logcat will display information related to the error in a stack trace.
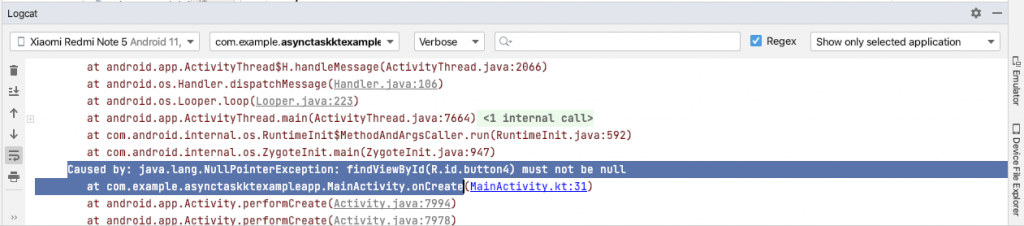
The above screenshot shows the Logcat after a crash caused by making reference to a wrong ID. The stack trace shows a NullPointerException and a very helpful message that specifies the line of code causing the error.
3. Referencing Views in Fragments
The third issue, which is also very common, occurs in Fragments. A fragment is a component for representing reusable parts of an app. It has its own layout file, a Kotlin file, and a life cycle. We can see fragments as mini activities because they can be inside an activity. It’s even possible to have multiple fragments in a single activity.
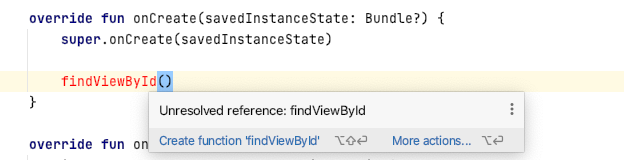
Although fragments and activities share some similarities, they implement the findViewById() differently. This difference makes the findViewById() method throw an unresolved reference error when used in the onCreate() method of a fragment. The screenshot below shows this error.
How can you resolve this issue? Place your code that uses the findViewById() method in the onViewCreated() method instead. This method isn’t present in the fragment class by default. For this reason, you’ll need to insert it by pressing CTRL + O, and then select onViewCreated from the options.
Below is an example code snippet showing the right way to use findViewById() in the onViewCreated method of a fragment.
4. False Positive Unresolved Reference
The last but not the least issue to debug is false positive errors and warnings. The ID parameter for findViewById is set using the “R” class. R is an auto-generated class, and it’s responsible for generating the actual integer value for a View’s ID.
Sometimes, Android Studio may experience issues synchronizing the current state of R. This leads to a false positive unresolved reference error. For example, it may happen after you add a new library to a project.
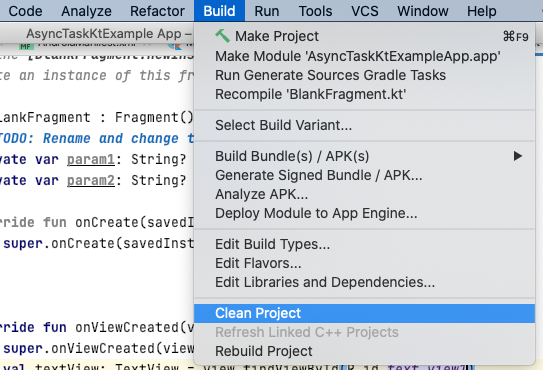
A quick fix is to navigate to Build -> Clean Project in Android Studio. This will initiate a Gradle task that cleans your project.
Another way to fix the problem is to run the Make Project task by navigating to Build -> Make Project. This will cause Android Studio to generate values for the R class where necessary. Most false-positive errors will disappear after you run both fixes.
Testing Views and Kotlin findViewById
Automated UI testing also uses the findViewById() method to reference Views. You can write tests to verify if a View is present on the screen. And if the View is present, the UI test tool can use the same reference to control the View. For example, a test may verify first that a button is visible before triggering a click event on the same button.
Finally, it’s possible to run automated tests for the behavior of UI elements without writing extra code. You can do this using Waldo’s no-code testing solution. You can try Waldo for free here. There’s also a helpful, searchable blog.
Wrapping Up and Considering New Projects
In this post, we’ve covered ways to debug the Kotlin findViewById() method. The issues we discussed are some of the most common challenges developers face while working with the method.
Finally, the findViewById method has been around for a long time. However, using it is no longer the recommended way for making references for Views in Kotlin. Consider learning about ViewBinding for any new projects.
This post was written by Pius Aboyi. Pius is a mobile and web developer with over 4 years of experience building for the Android platform. He writes code in Java, Kotlin, and PHP. He loves writing about tech and creating how-to tutorials for developers.
Automated E2E tests for your mobile app
Get true E2E testing in minutes, not months.