The big challenge with mobile development is managing all the operating systems (OSs) and devices out there. People have Android and iOS devices of different software types. That meant you needed to write the same code multiple times. But because this violates the don’t repeat yourself principle of coding, software developers set out to solve this problem.
What they came up with is software that can translate code into the format needed for different mobile OSs without having to rewrite it. Two well-known ones are Xamarin and React. If you’re starting a project, which one of these should you use? In this post, I answer that question
Xamarin vs. React Native
Xamarin is part of Microsoft’s .NET ecosystem. It allows you to create mobile applications. You write the code once, and it runs everywhere. Furthermore, you can code using just C#. There’s no need to learn Swift to write iOS apps and Java or Kotlin to write Android apps. You can also write apps for Windows phones. In addition, you can even use Xamarin to write tvOS, watchOS, and macOS apps.
React Native is based on React, a JavaScript library created by Facebook. React’s idea is, in a nutshell, to write JavaScript code that renders into HTML. After React was made, this concept was extended to React Native, taking the library and adapting it to mobile development. Like Xamarin, you can build Android and iOS apps.
So, now that you know a bit of background on these platforms, let’s see how they compare in terms of setup, coding, deployment, and testing.
Setup
To use Xamarin, you have to download and install Visual Studio. To install React Native, you need to use npm, a package manager for JavaScript. In terms of setup, I feel like Xamarin tends to work a bit better out of the box than React Native. You can write code and run it more easily. To run React Native apps, you need to do more configuration, like setting path variables in configuration files.
You’re a bit more boxed into coding using Visual Studio if you choose to develop in Xamarin. With React Native, you can use your preferred text editor.

Another difference is that you have to choose which type of OS you want to develop in when using Xamarin. When you create a project, you must specify the OS the app is to be run on so that the right boilerplate code can be generated. In React Native, creating the project is the same for Android and iOS.
Coding
Coding in Xamarin looks a lot like classic mobile development. You create the screens by adding elements like labels and buttons to a blank canvas. You can do this programmatically, or by dragging and dropping elements into the screen. Next, you write code that connects with and interacts with the elements.
Here’s what Xamarin looks like:
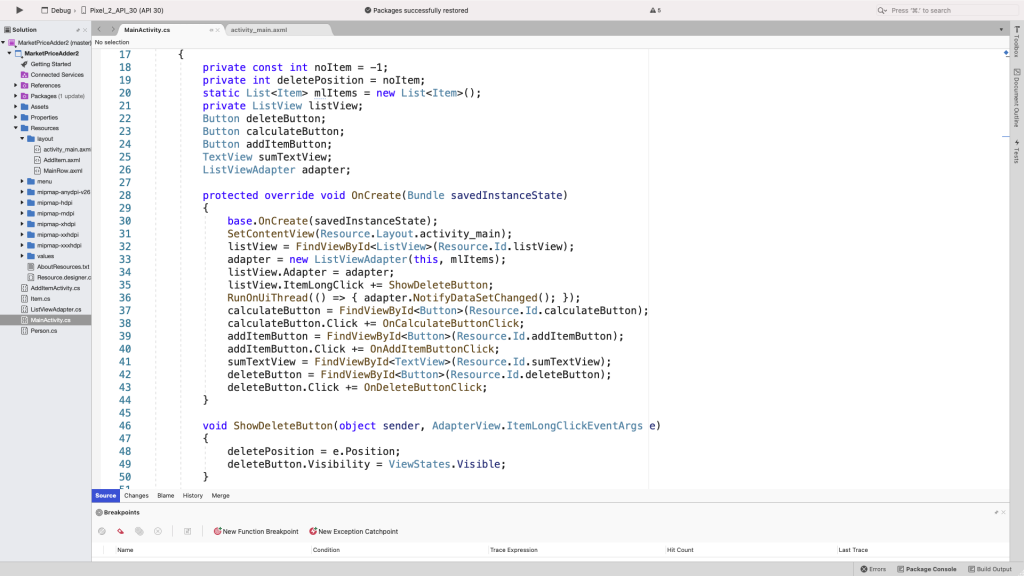
Later on in the post, I’ll explain the code a bit more, but this will give you an example of what Xamarin code looks like. As you can see, it looks very similar to coding other types of apps in ASP.NET and C#.
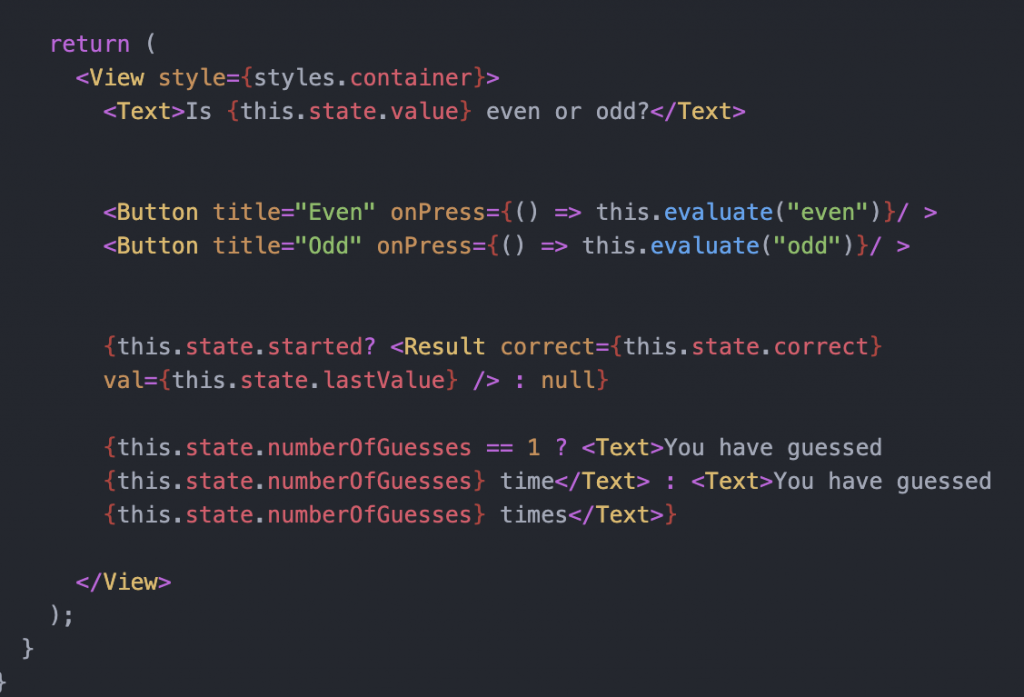
Coding in React Native looks like React. You build the app’s layout and functionality with React components. Instead of getting turned into HTML, they get turned into the format the mobile device needs.
To show what it looks like, here’s a screenshot from an app that asks the user to guess whether a number is even or odd. I’ll also explain it in more detail later in the post.
Deploying
Now that you have an app coded, you need a way to run it. With Xamarin and React Native, the deployment options are quite similar. You can deploy to a physical device or an emulator, which is a representation of the device on your computer.
To deploy on a physical device, you have to have the device handy. It must be connected via USB and configured for development. This can mean enabling debugging mode or setting up the proper accounts for Apple.
With Xamarin and React Native, you can run the app on iOS or Android, depending on which you want to try. You can run Android apps on a Mac, but you can’t run iOS apps on a PC—you need to use a Mac. This is a requirement of Apple, so all the mobile development platforms out there will have the same restriction.
While coding the app, you’ll make frequent changes. To see those changes in Xamarin, you’ll have to compile, install, and run the application again. This takes awhile and decreases the cadence at which you can iterate your way to a solution to the problem that you’re facing.
React Native makes this easier by automatically refreshing the app whenever you make a change. I enjoy this feature. It speeds up my cadence of coding and trying out changes.
Testing
Testing applications is one of the challenging parts of mobile development. You have to consider that the app runs on not only Android and iOS but on the versions of the OSs and the hardware devices that your customers are likely to use.
You can write tests for business logic, but so much of the app’s experience is about the sensory interactions with the platform. Do the elements look right on the screen? If there’s audio or video, does it play correctly? Do the accessibility features work?
Mobile testing is often a tedious manual process of a person trying the code on various devices and seeing if it works as expected. You can improve the mobile testing experience by automating tests using a tool like Waldo. Better yet, it’s no-code! Check out Waldo to see if it’s right for your team.
Examples
All right, let’s look at some applications!
Xamarin
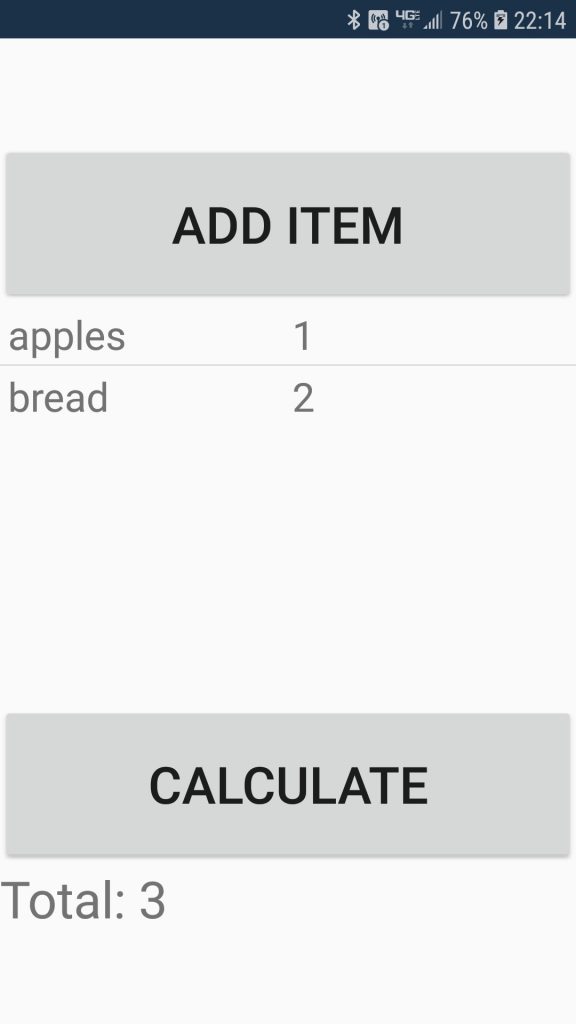
Here’s an app I made in Xamarin. It’s a combination of a calculator and grocery store list. I use it when going shopping in farmers markets to keep track of little purchases I make from different vendors. Doing this on pen and paper grew cumbersome, so I made myself an app to make the job easier. You add the name of something you want to buy and its price, and press “calculate,” and it tells you how much they cost all together.
Here’s the XML defining the UI elements.
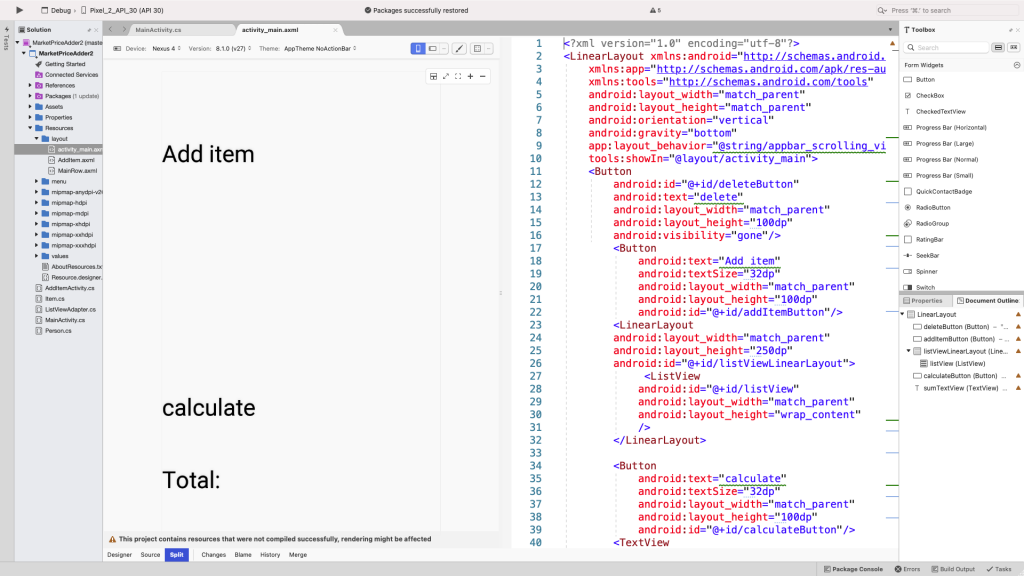
And here’s a code snippet of the code for the app’s main screen.
Homing in on the calculate button, we can see the basic workflow for working in Xamarin. First you create the button and define how it looks in the layout screen. You could do this by dragging and dropping a button onto the screen canvas, and editing using Visual Studio’s IDE, or add it by editing the AXML directly.

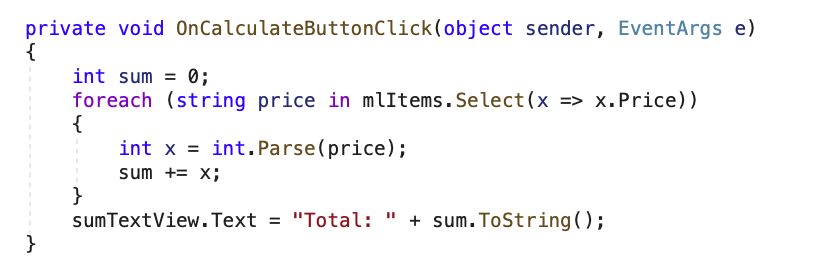
Then you declare it in the corresponding code file.

Next, in the code, you find the element by its ID and add functions to its events.

Finally, you add code that does something when an event happens. In this case, I add up the values of the items in the list when clicking the button. At the end of the function, I update a TextView by changing its Text property. Updating properties of other elements works in a similar way. You store the element in a variable that can be accessed and modified later on in the code.
React Native
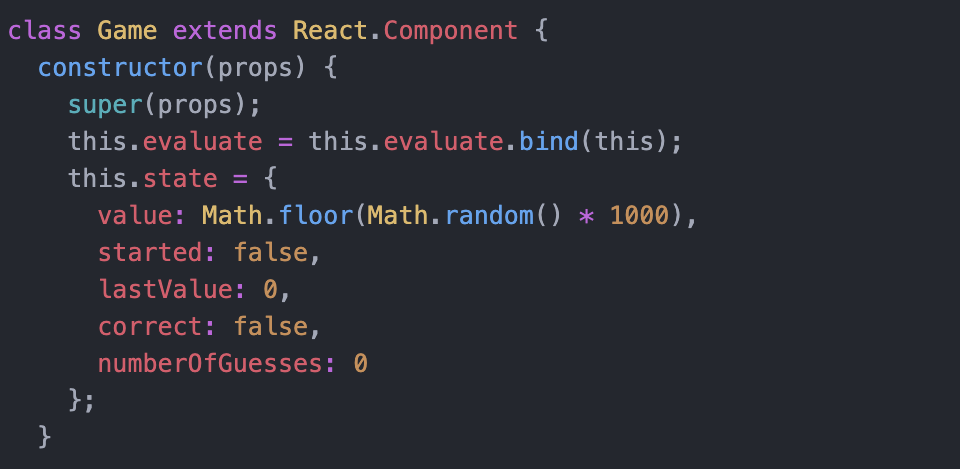
For React Native I made a simple guessing game app. The app picks a random number, and asks you to guess whether it’s even or odd. When you guess the app tells you whether you guessed correctly and how many guesses you have made.


I created a top-level component called Game, which holds all the subcomponents and information.

Within the Game component, at a glance you can see Text and Button components. These are built-in React Native components that allow you to add basic UI elements to the app. They’re what the user sees and interacts with.
You’ll also see a lot of calls to something called this.state. React and React Native use a state object within components to remember values. It’s essentially a JavaScript object where you can keep values you want to hold onto. Here’s the initial state of the Game component.
When you want to update an element, you need to update a component’s state. I do the updating using this.setState in the evaluate function, which evaluates the answer a user gives the app.
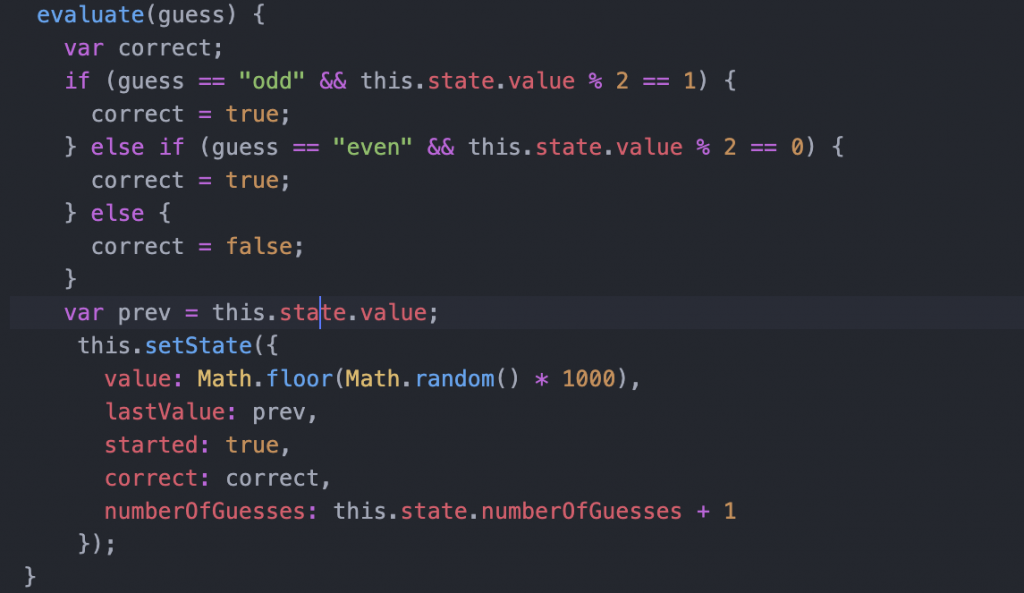
You don’t have to show the same components all the time. You can use conditionals to change the elements that are shown. I do this to show the number of guesses that have been made.

You can also pass values to other components using what are called props. I make use of this to tell the user whether their guess was right or not via the Result component that I created. Those two tags, correct and val, are the props—basically the data I want that component to have access to.

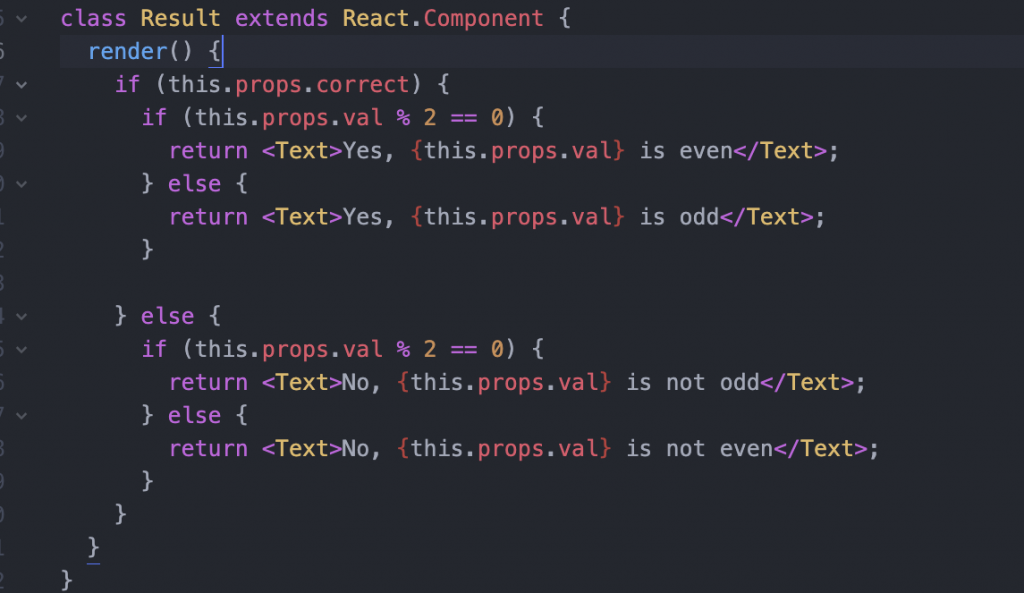
Here is what the Result component looks like. There’s also some conditional logic to decide what to show, based on whether the number to be guessed was odd or even, and if the user answered correctly.
Now that we’ve seen some code, I’ll share which I like better.
So, Is React Native or Xamarin Better?
I’ve had the most experience on the Android side of the house in developing in Xamarin and React Native. I’m also just a random guy on the internet you’ve never met, so take my opinions with the needed grains of salt.
That being said, I prefer making apps in React Native over Xamarin. React Native offers a more seamless cross-platform experience. There isn’t the separation between Android and iOS that there is in Xamarin. Additionally, I think React Native offers more flexibility for building an app. I like how components can be reused easily and have the data you need built into them. Finally, I really like how React Native’s automatic refresh feature speeds up development.

Why might someone prefer Xamarin for their projects? If you have a lot of code written in C#, it’ll be easier to incorporate it into a Xamarin project. If you like the .NET ecosystem, you’ll have access to the libraries you know and love. Finally, if you want to write a Windows phone app or if you want to cover all your bases in terms of devices your code will run on, you’ll need to use Xamarin, as React Native only works with Android and iOS.
If you don’t have a preference, though, and you just want to get an app working that will run on most smartphones, I’d go with React Native.
This post was written by Andrew Bryant. Andrew is a developer and data analyst. He’s worked for startups doing everything from NLP to UI fixes.
Automated E2E tests for your mobile app
Learn more about our Automate product, or try our live testing tool Sessions today.